 Warning!
This command line tool will cause all the NMS services,
IIS and SQL services to restart.
Warning!
This command line tool will cause all the NMS services,
IIS and SQL services to restart.Netspan Server change command line tool is used to Backup and Restore or bring in the database from another Netspan server. Both Netspan server and database must be of the same version for this tool to work. This tool can be executed two ways:
1. in DOS command window
2. or from NMS Server Manager tool
Warning!
This command line tool will cause all the NMS services,
IIS and SQL services to restart.
Netspan database can be backed up using either the Detach or Database Backup method. Detach method requires all Netspan services to be shutdown while the Database Backup does not.
Open the DOS command window and change the directory to that of the server change tool. The default installation location of this is C:\Program Files\Airspan Networks Inc\AS8200 Netspan V8\Setup\Setup.ServerChange.
At the command prompt type the
following line:
>setup.serverchange.exe
/A:B /M:ATTA /P:C:\NMSBkpData
This will output the following lines:
NMS ServerChange utility v255.8.60.001
This executable is going to Backup the NMS Database
on the Local Machine: NMSServerName
Do you want to continue (Y/N)?
Press ’y’ to continue.
Pressing 'Y' will output following lines:
Creating Log File
NMS Services Stopped
IIS Stopped
ReStarted SQL Server: NMSServerName (SQL2005) successfully
Stopped SQL Server: NMSServerName (SQL2005) successfully
Existing database files backedup successfully to c:\nmsbkpdata
Started SQL Server: NMSServerName (SQL2005) successfully
IIS started successfully
Operations completed SUCCESSFULLY on the local Server.
Press 'Enter' to exit the program.
This stops all Netspan services and makes a copy of the Netspan MDF and LDF files into directory C:\NMSBkpData.
Open the DOS command window and change the directory to that of the server change tool. The default installation location of this is C:\Program Files\Airspan Networks Inc\AS8200NetspanV8\Setup\Setup.ServerChange.
At the command prompt type the following line:
>setup.serverchange.exe /A:B /M:DBBR /P:C:\NMSBkpData
This will output the following lines:
NMS ServerChange utility v255.8.60.001
This executable is going to Backup the NMS Database
on the Local Machine: NMSServerName
Do you want to continue (Y/N)?
Pressing 'Y' will output the following lines:
Creating Log File
Starting database backup operation...
Existing database files backedup successfully to c:\nmsbkpdata\NetspanDB.BAK
Operations completed SUCCESSFULLY on the local Server.
Press 'Enter' to exit the program.
This will backup Netspan database, creating a backup file with extension BAK in directory C:\NMSBkpData without stopping any Netspan Services.
Netspan database can be restored either using the Attach method or Database Restore method. This depends on the backup method used to backup Netspan database. For restore to work successfully the restore files must be of the same version as the local NMS server. Both methods require all Netspan services to be shutdown and restarted.
The NMS SQL database restore files must be renamed to Netspan_Data.MDF and Netspan_Log.LDF and placed in folder C:\NMSBkpData for this operation to be successful.
Open the DOS command window and change the directory to that of the server change tool. The default installation location of this is C:\Program Files\Airspan Networks Inc\AS8200 Netspan V8\Setup\Setup.ServerChange.
At the command prompt type the
following line:
>setup.serverchange.exe
/A:R /M:ATTA /P:C:\NMSBkpData
This will output the following lines:
NMS ServerChange utility v255.8.60.001
This executable is going to RestoreAndActivate the NMS Database
on the Local Machine: NMSServerName
Do you want to continue (Y/N)?
Pressing 'Y' will output the following lines:
Creating Log File
NMS Services Stopped
IIS Stopped
ReStarted SQL Server: NMSServerName (SQL2005) successfully
Previous NMS Database successfully detached
Existing database files backedup successfully to C:\Program Files\Airspan Networ
ks Inc\Backup Files
Existing NMS database files deleted from target location successfully
Database files successfully attached to: NMSServerName (SQL2005).
Database ver 255.8.60.001 matched with Netspan ver 255.8.60.001
IIS SQL Server Login created
NMS Database 'Installation' settings updated
IIS reset successfully
IIS started successfully
Operations completed SUCCESSFULLY on the local Server.
Press 'Enter' to exit the program.
This attaches and activates the Netspan database files Netspan_Data.MDF and Netspan_Data.LDF found in C:\NMSBkpData.
The NMS SQL database restore files must be placed in the folder C:\NMSBkpData for this operation to be successful.
Open the DOS command window and change the directory to that of the server change tool. The default installation location of this is C:\Program Files\Airspan Networks Inc\AS8200 Netspan V8\Setup\Setup.ServerChange.
At the command prompt type the following line:
>setup.serverchange.exe /A:R /M:DBBR /P:C:\NMSBkpData\NetspanDB_02_11.BAK
This will output the following lines:
NMS ServerChange utility v255.8.60.001
This executable is going to RestoreAndActivate the NMS Database
on the Local Machine: NMSServerName
Do you want to continue (Y/N)?
Pressing 'Y' will output the following lines:
Creating Log File
NMS Services Stopped
IIS Stopped
ReStarted SQL Server: NMSServerName (SQL2005) successfully
Starting database backup operation...
Existing database files backedup successfully to C:\Program Files\Airspan Networ
ks Inc\Backup Files\NetspanDB.BAK
Starting database restore operation...
Restoration of database file c:\nmsbkpdata\netspandb_02_11.bak successful
Database ver 255.8.60.001 matched with Netspan ver 255.8.60.001
IIS SQL Server Login created
NMS Database 'Installation' settings updated
IIS reset successfully
IIS started successfully
Operations completed SUCCESSFULLY on the local Server.
Press 'Enter' to exit the program.
This restores and activates Netspan database from the restore file NetspanDB_02_11.BAK found in the directory C:\NMSBkpData.
Netspan database can be backed up using either the Detach or Database Backup method. Detach method requires all Netspan services to be shutdown while the Database Backup does not.
Backing up Netspan using Detach method
In the NMS Server Manager go to Properties->Database tab.
Select the Method as Attach/Detach.
Select Action as Backup to backup Netspan database.
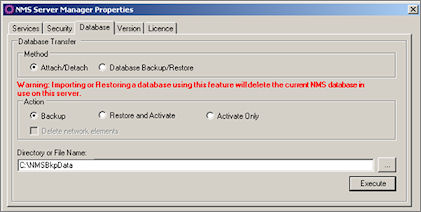
In the Directory or File Name Text box enter path name where you would like to save the Netspan backup Database.
Press the Execute button. This will open a DOS window and prompt to continue (Y/N)? Press ’r;y’ to continue.
After few lines of messages the last message will say ”r;Operations completed SUCCESSFULLY on the local Server”. Press 'Enter' to exit the program”.
This will complete Netspan Backup process.
In the NMS Server Manager go to Properties->Database tab.
Select the Method as Database Backup/Restore.
Select Action as Backup to backup Netspan database.
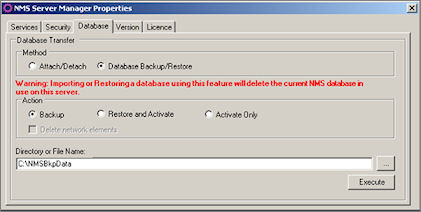
In the Directory or File Name Text box enter path name where you would like to backup Netspan Database.
Press the Execute button. This will open a DOS window and prompt to continue (Y/N)? Press ’r;y’ to continue.
After few lines of messages the last message will say ”r;Operations completed SUCCESSFULLY on the local Server”. Press 'Enter' to exit the program”.
This will complete Netspan Backup process.
Netspan database can be restored using either the Attach method or Database Restore method. This depends on the backup method used to backup Netspan database. For restore to work successfully the restore files must be of the same version as the local NMS server. Both methods require all Netspan services to be shutdown and restarted.
Restoring Netspan using Attach method
The NMS SQL database restore files must be renamed to Netspan_Data.MDF and Netspan_Log.LDF for this operation to be successful.
In the NMS Server Manager go to Properties->Database tab.
Select the Method as Attach/Detach.
Select Action as Restore and Activate to restore Netspan database.
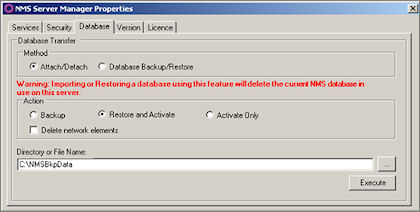
If you want to delete Network element in the Netspan Database check the Delete Network Elements check box.
In the Directory or File Name text box enter the path name of Netspan Database restore files Netspan_Data.MDF and Netspan_Data.LDF.
Press the Execute button. This will open a DOS window and prompt to continue (Y/N)? Press ’y’ to continue.
After few lines of messages the last message will say ”Operations completed SUCCESSFULLY on the local Server”. Press 'Enter' to exit the program”.
This will complete Netspan Restore process.
In the NMS Server Manager go to Properties->Database tab.
Select the Method as Database Backup/Restore.
Select Action as Restore and Activate Netspan database.
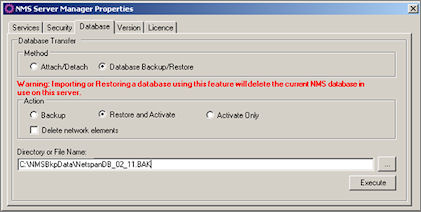
4. If you want to delete Network element in the Netspan Database check the Delete Network Elements check box.
5. In the Directory or File Name text box enter the path and the filename of the Netspan Database restore file.
6. Press the Execute button. This will open a DOS window and prompt to continue (Y/N)? Press ’y’ to continue.
7. After few lines of messages the last message will say ”Operations completed SUCCESSFULLY on the local Server”. Press 'Enter' to exit the program”.
This will complete Netspan Restore process.
setup.serverchange.exe [/? | [/RM] | [/A:action] | [/A:action] [/M:method] [/
RM] [/P:dbpath]
Where
/? Display this help message.
/A:action Specifies the type of the action (Backup, RestoreAndActivate, ActivateOnly).
/M:method Specifies the method chosen to perform the action (Attachment or DBBackupRestore).
/P:dbpath the location of the database files MDF and LDF files or the database backup file BAK.
/RM Delete all network elements from database after stopping all Netspan services.
Options:
B - Backup Netspan database without stopping Netspan services or SQL server.
R - Restores Netspan database and activates to operate on this server.
A - Activates Netspan Database to operate on this server after stopping all Netspan services.
ATTA - Attachment, copies the MDF and LDF database files after stopping all Netspan services and SQL server.
DBBR - Database Backup Restore, uses database server's transact backup and restore functions.
> setup.serverchange.exe /A:A
Activates Netspan Database to operate on this server.
> setup.serverchange.exe /RM
DELETE all Network Elements from Netspan database.
> setup.serverchange.exe /A:B /M:ATTA /P:C:\NMSBkpData
Stops all Netspan services and makes a copy of the Netspan MDF and LDF files into directory C:\NMSBkpData.
> setup.serverchange.exe /A:R /M:ATTA /RM /P:C:\NMSBkpData
Attach and activates the database files found in C:\NMSBkpData and DELETE all Network Elements from the cloned database.
> setup.serverchange.exe /A:B /M:DBBR /P:C:\NMSBkpData
Backup Netspan database, creating a backup file with extension BAK in directory C:\NMSBkpData.
> setup.serverchange.exe /A:R /M:DBBR /P:C:\NMSBkpData\NetspanDB_02_11.BAK
Restores and activates Netspan database from the backup file NetspanDB_02_11.BAK found in the directory C:\NMSBkpData.
Press 'Enter' to exit the program.