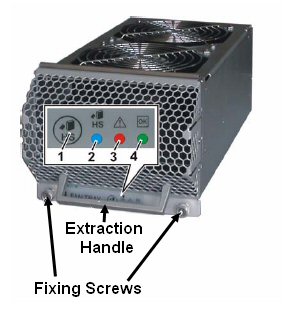
Hot Swap push button
Hot Swap LED (blue)
Fan Tray Alarm LED (red)
Fan Tray OK LED (green)
The 14 slot ATCA shelf contains three interchangeable fan trays. The fan trays are plugged-in at the front bottom of the shelf and can be removed after lifting the front cable tray.
|
|
|
Raise the cable tray to allow access to the slots.
Slide the fan tray into the guides until fully home.
Secure with the two fixing screws at the base of the unit.
The fans automatically start when the power is applied to the rack. The shelf manager regulates the fan speed.
When the fan is up to speed the fan OK LED set to green.
Raise the cable tray to allow access to the fans.
Press the 'Hot Swap' push button to initiate hot swap request sequence, and await the hot swap LED (blue) arriving at permanently on state. Unscrew the fixing screws and fully extract the unit using the extraction handle.
|
Hot Swap LED (blue) |
on |
board may be extracted |
|
long blink |
initialising | |
|
short blink |
deactivating (hot swap requested but not ready) | |
|
off |
board active, do not extract |
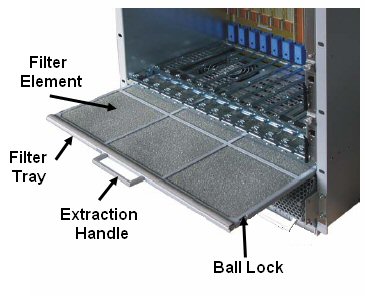
Raise the cable tray to allow access to the filter.
To install, push the air filter into the guide rails at each side of the shelf until the spring mounted ball lock engage. When installing the air filter, the filter element must be in top position.