This Topic describes how to configure a HiperMAX-micro base station using the “built in” web based interface. This prepares the equipment ready for connection to Netspan.
The following tools will be required:
Lap top PC with web browser
Ehernet connecting cables x 2 (at least 3m)
Ethernet switch with VLAN tagging capability (For local test when Netspan connection is not available)
Power HiperMAX-micro
Connect Laptop PC
Open HiperMAX-micro web page and set:
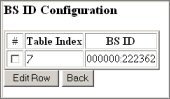
The BS ID
The SNMP passwords and traps
The IP address and management VLAN
Power cycle the HiperMAX-micro
Connect to backhaul and check connection with Netspan
Download Base Station image software using Netspan (see the Netspan User guide)
Provision Using Netspan
Prior to starting this process, the configuration information must be made available to the installation engineer. This includes the required BS IP address and subnet mask and the BS ID.
Connect AC mains power to the HiperMAX-micro (wait 2 minutes)
Connect PC to the Ethernet port of the HiperMAX-micro
Make sure that the PC has an IP address in the 192.168.0.xx range (e.g. 192.168.0.99 subnet 255.255.255.0)
Open web page with address 192.168.0.100 (HiperMAX-micro default IP address)
Enter the user name and password
User = asmax
Password = private
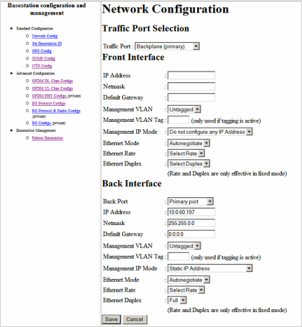
Select whether the blade is to be managed from the front of the Blade or using network access
Traffic Port : Select Backplane or Front.
IP Address/Network/Default Gateway: Set the IP address of the shelf for the interface being used to the selected IP address and subnet mask (The IP address must be provided to the installation team together with the other installation job information – location, equipment physical build and antenna details) Leave unused interface blank.
Management VLAN/VLAN Tag: Set the Management VLAN to the required setting
Management IP Mode: Set to Static IP address for interface being used , set to Do not configure any IP address for interface not being used.
Ethernet Mode/Rate/Duplex: Set to Autonegotiate
Save Configuration
 Warning:
Check before you select "Save". If you configure an address
that is not routable from your network location, you will lose contact
with the basestation and may need physical access to the equipment for
recovery. Changes will take effect on next reboot
Warning:
Check before you select "Save". If you configure an address
that is not routable from your network location, you will lose contact
with the basestation and may need physical access to the equipment for
recovery. Changes will take effect on next reboot
Select the BS ID item from the left menu and enter the BS ID according to the information provided. The box has to be checked to enter the ID
Note: The format is important: NNNNNN:nnnnnn (where NNNNNN is the Operator ID and nnnnnn is a unique address ID)
Set the SNMP parameters
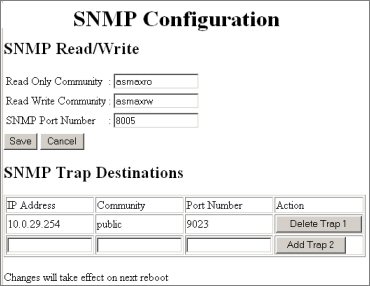
read only community = SMNP read only community name defined by the BS network provider
read / write community
= SMNP read/write community name defined by the BS network provider
Set the Port number for communications with Netspan to 8005
Set the SMNP trap to the IP address of Netspan with a port number of 9023
Power cycle the HiperMAX-micro (Remove the mains power for 10 seconds and then re- connect)
Connect the HiperMAX-micro Ethernet connection to the backhaul network and contact the Netspan operations centre to check the connection.
Note: If
the backhaul connection is not available a local test can be made but
the test PC has to have an IP address in the correct IP range and a small
Ethernet switch with VLAN tagging capability will be needed. The log in
password to the web interface will now be SMNP read/write community name
set above
The equipment shipped may need the software upgraded. To do this see the Netspan User Guide or help file