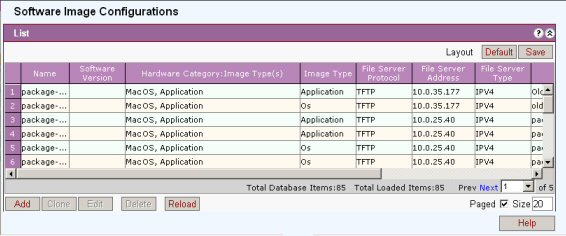
Setup pointers to the software image locations. for the BS OS, Application , SCRT, and Security Certificates as necessary for your hardware type. On a new system Initially there are no Image Files defined.
Click 'Add' to add additional pointers to the image code
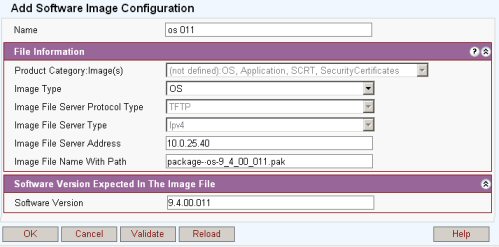
Product Category image(s): Select hardware that the image is intended for. (OS, Application, SCRT Images etc.)
Image Type: Select the image type. The image types offered are dependant on the product selected (OS: Application: SCRT) A separate image file is needed for each image type.
Image File Server Protocol Type: This is automatically assigned dependant on the image selected, TFTP for Base Station, FTP for Subscriber Station
Image File Server Type: IP address type. (only Ipv4 supported currently)
Image File Server Address: Enter the network address where the TFTP/FTP server is located.
Image File Name With Path: The file name of the Image file must NOT contain the path only the file name. The path will be handled by the TFTP/FTP server. There is no ability to browse to location.
SS Configurations only
User Name and Password: These fields are only present for SS Images that come from an FTP server and the User name and password are as set in the FTP server.
Software
Version: Enter in this field the software version that is contained
in the image file.
Note: It is important that this is correct if the s/w version is wrong
the download will continually re-try and the user will never see it successfully
completed.
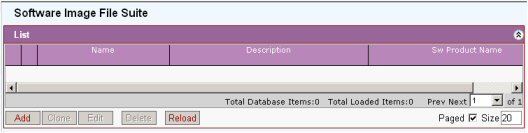
Setup the Software Image File Suite this brings together the images to be downloaded). It will be referenced by individual nodes (BS or SS) or by the Upgrade Categories to perform a system-wide upgrade.
Click Add to add a new software image file suite. Add name, select 'Product Category Image' Click on software type in list and the click 'Edit'. Select file configuration and apply.
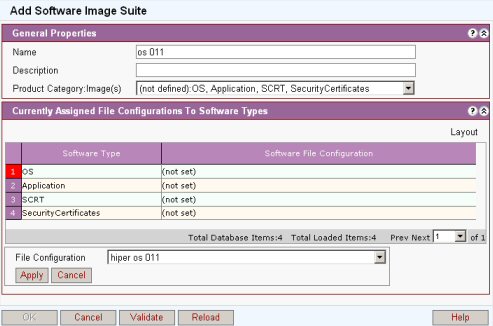
Note: In a new profile there is no software file configuration specified. It is necessary to select the number of the software type, then select “EDIT”. A pulldown menu will be available under Software File Configuration allowing for one of the images defined in the previous step to be chosen.
Repeat 2 above for the other images to be grouped into the image file suite. The screen capture below shows a completed image file suite.
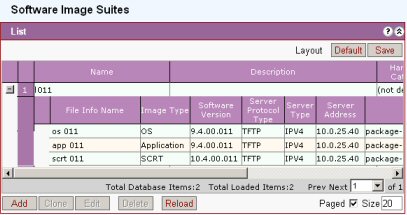
Note: the download will only be to the BS or SS hardware type which it is set to.
Configure Software Management Product for global actions to be performed for the BS shelf. There are entries for the SS, and different types of Base Station.
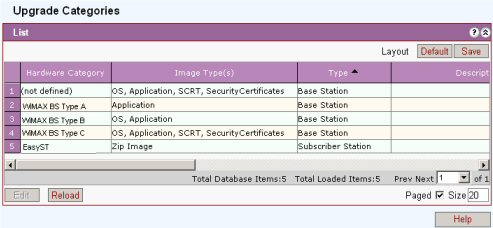
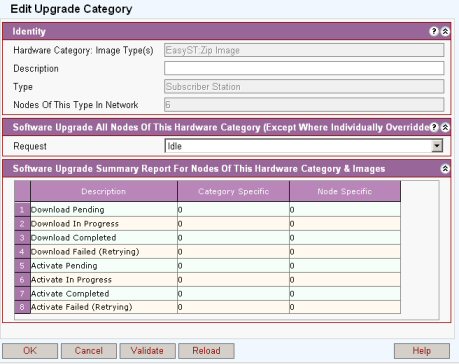
Select the category and click edit. Once selected the product will have the following options under “Request”
If set to idle the software will not be downloaded until the request is set
If download then the software is downloaded then the Image File Suite options are displayed. Select the Image File Suite to be downloaded into the BS/SS
If activate the BS/SS is set to run with this image. It will automatically be rebooted and then the requested s/w will run.
SS's also have the option to:
Assign to Primary. Ensures (if possible) that the version requested ends up in the primary bank. The subscriber does not lose service but the software does not become active until the SS is reset or rebooted.
To perform a system-wide upgrade this should be set to “Download Software”, otherwise for individual BS/SS upgrade leave as “Idle”
Click OK to initiate the download.
To check progress of the download reopen the edit products window and observe the Statistics display
After this process has completed the process needs to be repeated to Activate/Assign to Primary the software download .
Option 2: Individual Station Upgrade
Open the Software Management Upgrade Categories. Select the category that is relevant and set to or leave as “Idle”
Go to the Configuration management screen. Select Base Station or Subscriber Station and select the hardware to be upgraded form the list. More than one may be selected from the list using the Cntrl and Shift keys. Click 'Edit' select the 'Software' tab. One can follow the global configuration setup in the previous step or override with a specific action and profile as shown below :

Window with heading of “Current Software Status” will be populated after changes have been made.
To check progress of the install refresh the screen by clicking reload. (The stages observed are TFTP/FTP,installing, Bytes DL and Installed.) After the Application shows a status of Installed, the software can be activated.
Use 'Configure Software' tab and set the request to Activate (or Assign to Primary for SS if required). Click 'Apply'
After swapping the Standby and Primary banks the Status changes to “Rebooting”. Note SS only: If Assign to Primary has been used for an SS the SS does not reboot and status becomes 'Idle'.
After rebooting the hardware will run the new code. Note SS only: If Assign to Primary has been used for an SS the SS does not reboot until the Subscriber resets the SS or the SS is reset from the SS Management: Actions screen.
It is possible to have mixture of option 1 and option 2, to allow network-wide upgrade with some equipment specific upgrade (where overridden individually on Manage/Software tab on individual BS or SS).