|
|
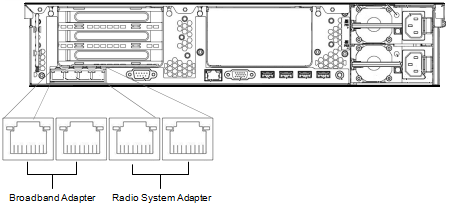
The IP Address of the Radio System Adapter.
If you have already configured your WAVE 3000 Server, then this address should be the Address you obtained from your IT administrator. If you have not configured your WAVE 3000 Server, then the default address is https://192.168.0.1 If you do not know the IP address of the Radio System Adapter, then you cannot use this procedure. |
|
|
A Windows 7 PC.
Other versions of Windows may work as well, but the instructions in this section are written for operation on a Windows 7 computer. |
|
|
One Ethernet cable.
For connecting the WAVE 3000 Server and the PC. |
|
2.
|
On the PC connected to the WAVE 3000 Server, click Start > Control Panel > Network and Internet > Network and Sharing Center.
|
|
3.
|
In the left frame, click Change Adapter Settings.
|
|
6.
|
In IP Address, enter the IP address of the Radio System Adapter. If you have already configured your WAVE 3000 Server, then use the IP address you set. The default address is 192.168.0.1
|
|
7.
|
In Subnet mask, enter the subnet you set for the Radio System Adapter. This should be the same as your XRT 9000/9100 Gateway. The default address is 255.255.255.240
|
|
8.
|
Leave Default gateway blank.
|
|
9.
|
|
10.
|
Open a web browser and type the address of the Radio System Adapter in the Address bar. If you have not configured your WAVE 3000 Server, the default address is https://192.168.0.1. If you have already configured your WAVE 3000 Server, then use the IP Address you specified.
|
|
12.
|
Use the default password admin to login.
|
|
13.
|
|
14.
|
In the Broadband Adapter section, change the IP Address of the Broadband adapter and click Commit Changes.
You should now be able to access the WAVE 3000 Server administrative interface via a browser on any computer connected to your network. |
|
15.
|
Open a browser on a PC that is not physically connected to your WAVE 3000 Server and type https://and the new IP address you specified.
|