|
The device manager is for basic configuration and
monitoring of the switch. Use this introduction to familiarize yourself
with its features.
Back to Top
Introduction
The device manager displays real-time views of switch configuration and performance. It simplifies configuration tasks with features such as Express Setup for quickly setting up the switch and its ports. It uses graphical, color-coded displays, such as the Front Panel view, graphs, and animated indicators to simplify monitoring tasks and to help you to identify and to solve networking problems.
Although extensive networking knowledge is not necessary, we recommend familiarity with LAN switch fundamentals. The Cisco Press General Networking Resources website has links to documents that provide internetworking overviews.
For comprehensive configuration and monitoring features,
use Network Assistant or the
switch command-line interface (CLI).
You can display the device manager from anywhere
in your network through a web browser such as Microsoft Internet Explorer.
Note: We recommend that you run the cryptographic
software image on the switch and use the device manager in a secured session. See Using Secured Sessions for information on protecting
your device manager session from unauthorized access.
Back to Top
Using the Front Panel View
The Front Panel view is a graphical display of the switch front panel, and it is always visible during the device manager session. The switch components on the Front Panel view are color-coded by status. The colors help you to quickly see if a fault or an error condition exists. A  Legend describes the meanings of the colors. Legend describes the meanings of the colors.
The system-level LEDs and port-level LEDs on the Front Panel view and on the physical switch match. You can change the port LED behavior by selecting a port mode from the View list on the Front Panel view.
Move the pointer over a port to display specific information about the port and its status. The speed and duplex mode for a port only appear in the pop-up window when a device is connected to the port. For dual-purpose ports, the Type field in the pop-up window displays 10/100/1000BaseTX for the copper uplink port whether or not the port is active. The Type field also displays either the type of SFP module installed or Empty if a module is not installed. The PoE status is available if the switch is a PoE switch.
The Uptime field shows how long the switch has been operating since it was last powered on or was restarted. Status is automatically refreshed every 60 seconds or when you click  Refresh. The refresh counter shows the number of seconds that remain before the next refresh cycle starts. Refresh. The refresh counter shows the number of seconds that remain before the next refresh cycle starts.

Back to Top
The meanings of the system-level LED colors are also described in the Legend.
STATUS |
The status of the ports. This is
the default mode. |
DUPLX |
The duplex mode (full duplex or
half duplex) of the ports.
Note: The 10/100/1000 ports operate only
in full-duplex mode. |
SPEED |
The operating speed (10, 100, or
1000 Mbps) of the ports. |
PoE |
The PoE LED shows the status of PoE being provided to the ports. This LED is available on switches that have PoE ports. |
EN |
The Enable LED shows that the module has passed its self-test and is available to the router. |
Back to Top
The meanings of the port LED colors are also described in the Legend.
| LED Mode |
Description |
Status |
In this mode, the port LEDs show port status, port duplex mode, port speed, and PoE status.
By default, the port LEDs show port status. To display the port duplex mode, the port speed, and the PoE status from the port LEDs, you must use the View list. |
Duplex |
In this mode, the port LEDs show the duplex mode (full duplex or half duplex) of the ports.
Note: The 10/100/1000 ports operate only in full-duplex mode. |
Speed |
In this mode, the port LEDs show the operating speed (10, 100, or 1000 Mb/s) of the ports. |
PoE |
In this mode, the port LEDs show the status of the Power over Ethernet (PoE) ports. |
Back to Top
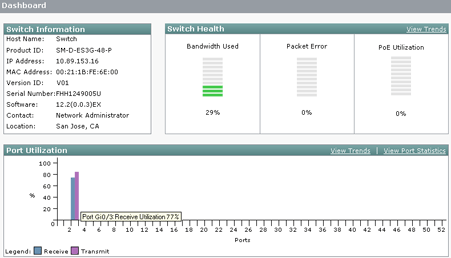
Using the Dashboard
The Dashboard provides information about the switch and is the main window for monitoring the switch status and its performance. It is the default window and appears each time that you display the device manager. For more information about the gauges, indicators, and graphs, see Dashboard.
Back to Top
Using the Toolbar Icons
|
|
Refresh |
Click Refresh to update the
information displayed on the Front Panel view, the graphs, and the configuration
and monitoring windows. |

|
Print |
Click Print to print a device
manager window, such as the Dashboard or the Port Statistics window.
Note: The menu or the Front Panel view
cannot be printed. To print an online help page, click Print
from the online help title bar. |

|
Smartports |
Click Smartports to display
the Smartports window from which you can enable Cisco-recommended system
and port-to-device settings. You can also display the Smartports window
from Configure > Smartports. For information, see Smartports. |

|
Software Upgrade |
Click Software Upgrade to
upgrade the switch software. You can also display the Software Upgrade
window from Maintenance > Software Upgrade.
For more information, see Software Upgrade. |
|
|
Legend |
Click Legend to display a
color-coded explanation of the icons and colors used on the Front Panel,
Port Status, and Port Settings windows. You can also display the
Legend from
 Help.
Help. |
|
|
Help |
Click Help for a description
of the device manager features and for procedures on how to use the
features. The Help also provides links to the
Legend and to support resources (such as the switch
documentation and technical assistance). |
Back to Top
Using the Menus
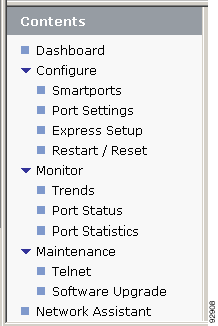
|
Dashboard
The Dashboard is the primary window for monitoring overall switch and port conditions.
The Front Panel view LEDs also provide information for monitoring the switch and its ports.
Configure Options
The Configure menu provides options to set up the basic network settings for the switch and its ports and to restart and to reset the switch.
Monitor Options
The Monitor menu provides options to display status and detailed run-time statistics every 60 seconds or when you click Refresh.
The Front Panel view LEDs also provide information for monitoring the switch and its ports.
Maintenance Options
The Maintenance menu provides an option to start a Telnet session and an option to upgrade the switch software.
Network Assistant
The Cisco Network Assistant window links to the Cisco.com website from where you can download this network management application to the switch.
|
Back to Top
Using Secured Sessions
The switch uses the Secure Sockets Layer (SSL) protocol to secure the HTTP communications between the switch and your network management station. When you attempt to display the device manager, this protocol
- Authenticates the web-based connection between the switch and your network management station.
- Encrypts and decrypts the information exchanged between the switch and your network management station to protect the information from unauthorized access over the Internet.
SSL is enabled by default on the switch.
When you first display the device manager, it displays a message that asks if you want a secured session with the switch.
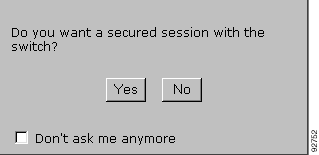
If you choose Yes, the switch displays another message that asks if you want to proceed by using the security certificate of the switch.
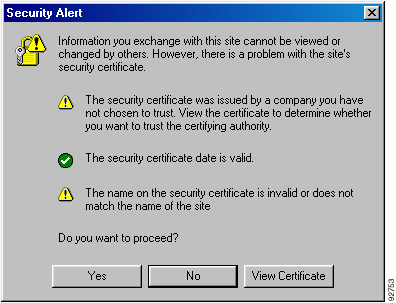
If you
choose Yes, the switch displays the device manager
in secure mode.
If you choose No for either message, the switch displays the device manager in unsecured mode.
There are other ways to start a secured device manager session:
- Enter https:// before the switch IP address. (HTTP over
SSL is abbreviated as HTTPS.)
- Click the Session: Standard | Secured link at the top right corner of the device manager window.
There are several ways to determine whether your device manager session
is secured:
- Look at the URL in the browser Address field. A URL that starts
with https:// means that the session is secured through
SSL. A URL that starts with http:// means that the session
is not secured.
- Look at the Session: Standard | Secured link
at the top right corner of the device manager window.
- If the link appears as Session: Standard | Secured,
the switch is running a secured session.
- If the link appears as Session: Standard | Secured,
the switch is not running a secured session.
- Look for a locked padlock image at the bottom of your browser window. The locked padlock only appears if the session is secured.
Back to Top |