This section is a copy of the printed document provided with your WAVE 3000 Server. This copy is provided in the event you must physically move your WAVE 3000 Server but have lost the original printed instructions. If you have already completed this procedure, then proceed to Accessing the WAVE 3000 Server
This section provides instructions for connecting the physical hardware components of a version 1.2 WAVE 3000 Server and configuring IP addresses for initial connection to a Motorola Linked Capacity Plus radio system. This section is identical to the instructions shipped with the WAVE 3000 Server. If you have already connected the physical system components, then proceed to Accessing the WAVE 3000 Server Use the link at the end of each section to proceed to the next setup step.
|
4.
|
On the PC connected to the WAVE 3000 Server, click Start > Control Panel > Network and Internet > Network and Sharing Center.
|
|
5.
|
In the left frame, click Change Adapter Settings.
|
|
6.
|
|
8.
|
|
A.
|
|
B.
|
|
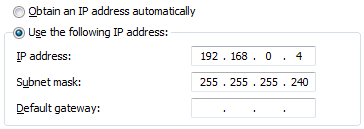
C.
|
Leave Default gateway blank.
|
|
D.
|
|
9.
|
Open a web browser and type https://192.168.0.1 in the Address bar.
|
|
11.
|
Use the default password admin to sign-in.
|
|
12.
|
|
13.
|
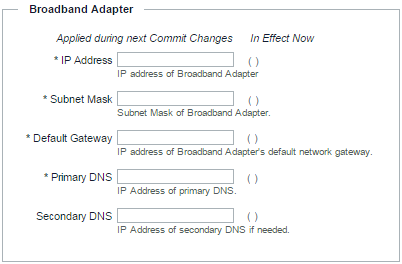
Configure the Broadband Adapter with a public IP address, allowing it to connect to the internet so that it can obtain licensing information.
 |
|
A.
|
IP Address
Enter an IP address. By default, this address is 192.168.0.2. |
|
B.
|
Subnet Mask
Enter a Subnet address. By default, this address is 255.255.255.240. |
|
C.
|
Default Gateway
Enter a Default Gateway address. By default, this address is 192.168.0.1. |
|
D.
|
Primary DNS
Enter a primary DNS address. By default, this address is 192.168.0.1. |
|
E.
|
Secondary DNS
Optionally, enter a Secondary DNS address. By default, this address is 192.168.0.1. |
|
14.
|
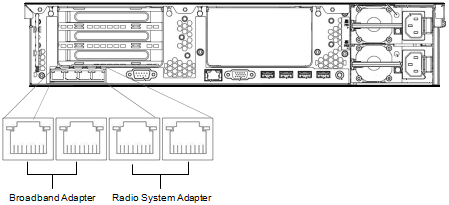
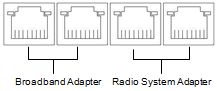
Click the Commit Changes button. Disconnect the WAVE 3000 Server from your PC, and connect the WAVE 3000 Server unit to a local switch or router using one of the Broadband Adapter ports. Do not use both Broadband Adapter ports. You should now be able to access the WAVE 3000 Server unit from any computer on the same network using a browser to navigate to the IP address you supplied for the Broadband Adapter.
|
|
|
The Setup > WAVE Mobile Communicator > Connection Port
The Setup > WAVE Mobile Communicator > Connection Port (default 4502) is determined by the WAVE 3000 Administrator. |
|
|
The Radio System Master UDP port (for Capacity Plus and Linked Capacity Plus radios).
The Radio System Master UDP Port is determined by the WAVE 3000 Server Administrator and set in Setup > Radio System Interface. This port is also configured in the Capacity Plus and Linked Capacity Plus repeaters in Link Establishment > Master UDP Port. The two port settings must match. |