|
1.
|
|
2.
|
|
3.
|
|
A.
|
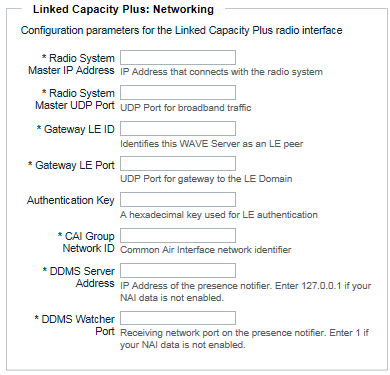
In Radio System Master IP Address, enter the IP address connecting to the Linked Capacity Plus radio system. In the Linked Capacity Plus repeater, this address is labeled “Master IP.”
|
|
B.
|
In Radio System Master UDP Port, enter the UDP port for broadband traffic. In the Linked Capacity Plus repeater, this address is labeled “Master UDP Port.”
|
|
C.
|
In Gateway LE ID, enter the ID used to identify the WAVE 3000 Server to Linked Capacity Plus as an LE (Link Establishment) peer. In general, this is a unique number that does not occur in the radio system.
|
|
D.
|
In Gateway LE Port, enter the UDP port that serves as the gateway to the LE (Link Establishment) domain. The WAVE 3000 Server uses this port to send and receive audio and keepalive messages with the Linked Capacity Plus radio system.
|
|
E.
|
In Authentication Key, enter the LE authentication key (if used). Leave blank if your Linked Capacity Plus system is not configured to require an authentication key.
|
|
F.
|
In CAI Group Network ID, enter the Common Air Interface network identifier. In the Linked Capacity Plus repeater, this ID is labeled “CAI Group Network.”
|
|
G.
|
In DDMS Server Address, enter the IP address of the Linked Capacity Plus presence notifier. If your Linked Capacity Plus system does not use NAI Data, then enter 127.0.0.1 for the IP address.
|
|
H.
|
In DDMS Watcher Port, enter the receiving network port for the Linked Capacity Plus presence notifier. If your Linked Capacity Plus system does not use NAI Data, then use 1 for the port.
|
|
4.
|
|
A.
|
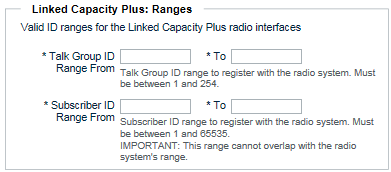
In Talk Group ID, enter the start and end range of Talk Group IDs to register with the Linked Capacity Plus radio system. All specified IDs in the range will attempt to register with the radio system, so limit the range to what you require. IDs for Talk Groups integrated between broadband and radio users must match, therefore the range you select must include the Talk Group IDs in the radio system. The WAVE 3000 Server will prevent you from creating Talk Groups outside this range.
|
|
B.
|
In Subscriber ID, enter the start and end ranges of Subscriber IDs for broadband users only. This range must not include radio users. The WAVE 3000 Server will prevent you from creating radio users inside the specified range. The WAVE 3000 Server will prevent you from creating broadband users outside the specified range. All specified IDs in the range will attempt to register with the radio system, so limit the range to what you require. Ensure your IDs do not overlap with those used by the radio system including subscribers on connected Sites.
|
|
5.
|
|
A.
|
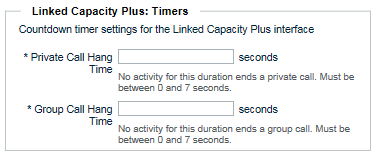
In Private Call Hang Time, enter the amount of time in seconds required to terminate a Private Call. This value should match the Private Call Hang Timer specified in the Linked Capacity Plus system. Each Private Call transmission between a radio and a broadband client resets this timer. Once the timer expires, the Private Call session is terminated and all resources are freed.
|
|
B.
|
In Group Call Hang Time, enter the amount of time in seconds required to terminate a Group Call. When this timer is exceeded, the Group Call session is terminated and all resources are freed. This only applies to connections between radios and broadband clients. New Group Call resources are immediately acquired when a Group Call transmission is made between a radio and a broadband client. For best results, match the corresponding value in the Linked Capacity Plus system.
|
|
6.
|
|
7.
|
|
8.
|
In the Anonymous User section, enter a value to identify anonymous WAVE users to the Linked Capacity Plus Radio system. This field is used to identify WAVE users without Subscriber IDs. Linked Capacity Plus radio system administrators should use the specified ID in this field to identify an anonymous WAVE user to radio users.
 |
|
9.
|
In the Time Zone section, select the time zone for your WAVE 3000 Server.
 The time zone you select is applied to the WAVE 3000 logs. |
|
10.
|
Click the Save button.
|
|
1.
|
|
2.
|
|
3.
|
|
A.
|
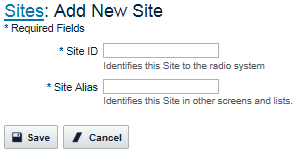
In Site ID, enter a valid ID for your site. Site values must be between 1 and 15.
|
|
B.
|
In Site Alias, enter the Alias used to identify this site in other screens and lists.
|
|
4.
|
Click the Save button.
|