|
1.
|
Sign in to the WAVE 3000 Server, and then click the Talk Group tab.
The Talk Groups page opens displaying a list of existing Talk Groups. At initial setup, the Talk Groups table will be empty. |
|
2.
|
|
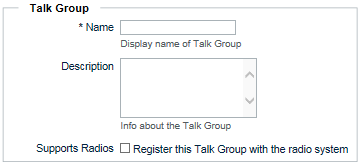
A.
|
In the Name field, enter the name of the Talk Group as it will appear to broadband users.
|
|
B.
|
In the Description field, optionally enter a description. The description is for administrative purposes only and does not appear outside the WAVE 3000 Server.
|
|
C.
|
Select Supports Radios if this Talk Group will also include Linked Capacity Plus radio users. If you do not select this button, then the Talk Group can only be used by WAVE clients. This selection unlocks the Radio Interface fields (below).
|
|
4.
|
|
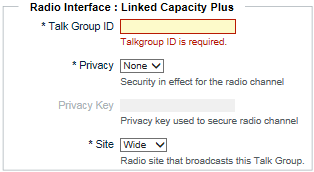
A.
|
In Subscriber ID, enter the ID of a Group existing in the Linked Capacity Plus System.
|
|
B.
|
In Privacy, optionally select a privacy mode.
|
|
C.
|
In Privacy Key, enter the privacy key string for this Group ID in the Linked Capacity Plus System.
|
|
D.
|
|
5.
|
|
Important:
|
Do not click Commit Changes until you have created all Talk Groups and associated them with WAVE users. The next two sections provide instructions for associating WAVE users with Talk Groups and Contacts.
|